What Prompted the Need for Updated Labeling Tooling?
Modern vehicles can be equipped with a variety of different sensors for assistance systems or autonomous driving. Common examples are cameras, RADAR and LIDAR sensors and many more.
While some assistance functions such as an adaptive cruise control often use single sensors of one type, more advanced functions for SAE levels 3 and above typically use multiple sensors, for example a combination of multiple cameras and a LIDAR sensor.
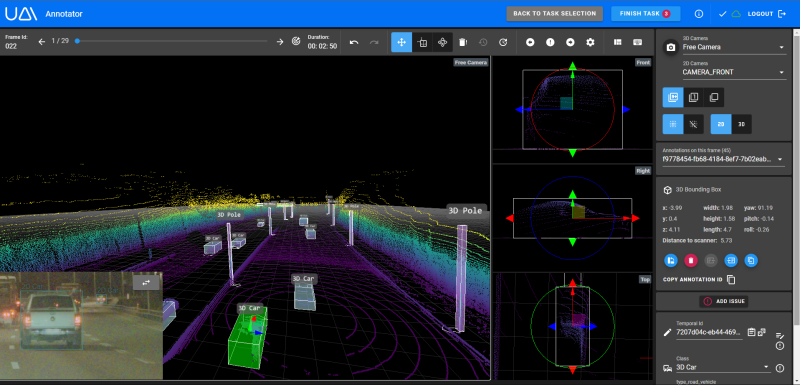
To accurately label objects detected across various sensors, it's imperative for labelers to simultaneously view these diverse sensor outputs. This enables them to establish relationships between annotations, such as identifying that an object in a LIDAR point cloud corresponds to the same real-world object depicted in an image captured by a camera:
The functionality of our tooling prior to this addition involved separate applications for 3D labeling and 2D labeling. This came with some challenges for the users:
To obtain all the necessary information and context to label an object comprehensively, users had to open both applications in parallel, negatively impacting the user experience. Furthermore, our data model was sensor-centric rather than object-centric which meant one could assign a different classification to a 3D annotation compared to its 2D counterpart, a scenario that often diverged from the desired outcome.
It became clear that we need a better solution in order to enable efficient labeling.
What did the development approach look like, and what were the main challenges?
A common problem development teams face is identifying the most important problems to solve without spending too much development efforts upfront.
In our case, this meant conducting problem discovery while allocating sufficient time for concurrent development of other aspects of our tooling, and providing project support while minimizing context switches for developers.
As we consistently gather product feedback, we had a solid understanding of the pain points within the existing tooling even before we started development.
Based on this existing feedback, we identified the most important use cases to address and prioritized them so that we were able to build our MVP as a high-fidelity prototype. We then used the MVP to collect more feedback from users and other stakeholders until we had enough confidence to build the first release.
We then did a high level estimation and plan for the first release, which included the following aspects:
- What is the most important functionality we need in our first release to make it valuable? What are potential other features we can add later on?
- How can we build the new tooling incrementally?
- Can we leverage existing components? Which technical dependencies exist between components, and how does that impact our work?
- How can we guarantee backward compatibility while implementing substantial changes to the data model and APIs?
- Do we have all the requisite knowledge in the team or do we need assistance from other individuals or teams?
- Do we have to migrate existing data or projects?
After evaluating all these different aspects, we had a clear understanding of the scope for our first release and felt highly confident in our ability to build and launch it. We mapped out our plan for the first weeks and then started the actual development. Within two weeks, we had a preliminary developer build to gather feedback, and we proceeded in this manner until we achieved our first user release six weeks later.
What does the new 2D 3D tooling do differently?
Our new multi-sensor tooling represents an important improvement compared to our previous solution:
Users can now simultaneously view both 2D and 3D sensors providing them with the necessary context to evaluate a scene and understand the relationships between objects captured by the different sensors.
- For the users, it is now easier and faster to label identical objects across different sensors. Instead of manually assigning attributes like vehicle type (e.g., car or truck) for each frame and sensor, consistent properties are automatically transferred to the corresponding annotations on other sensors
- Users can now simultaneously view both 2D and 3D sensors providing them with the necessary context to evaluate a scene and understand the relationships between objects captured by the different sensors.
Users now benefit from better UX as we have improved existing features such as navigation within the clip and between the different sensors and cameras as well as the selection and editing of linked objects.
In addition, we optimized the performance for point cloud rendering and asset loading for all of our labeling applications.
If you want to find out more about our 2D / 3D user interface within our Ground Truth annotation platform, get in touch with our experts!